Here it is the beginning of fall and the leaves are slowly beginning to turn. As the leaves fall lots of changes are being made. Silver Dollar City was a great adventure and I have to say I really enjoyed visiting with all the folks that came by the booth.
I will be keeping up with the Primitives By The Light Of the Moon blog and hope that you will find your way over. I plan to add lots of tutorials and free doodles as time allows.
I do appreciate each and every visitor and follower!
Happy Trails.....Ginger

Monday, September 30, 2013
Tuesday, April 30, 2013
Punchneedle Part 2 Finishing A Needle Case
Needle cases come in handy when traveling. This little strawberry punched piece was simple and easy to make!
If you enjoy doing punchneedle this is a simple and quick way to finish off your piece and make it into something that can be given as a gift or use for yourself.
Until We Meet Again.....Ginger
Monday, April 29, 2013
Finishing a Needle Punch Project
Making these little pieces into Strawberry Needlecases is simple and easy with just a little bit of glue and a stencil brush. I'll show you the finished project in the next post!
Hope you enjoy the little video clip.
Until We Meet Again....Ginger
Thursday, April 18, 2013
A Free Doodle For You

Just a little doodle to punch, hook, stitch, or paint!
Enjoy!
Until We Meet Again....Ginger
Thursday, April 11, 2013
Red Dirt Homestead Penny Rug

Pati Jane stitched up this wonderful pictorial penny rug. I drew up the simple little farm animals, house, moon, and farm wife and husband. She did a great job on making it look olde and love how the ballot bag turned out after dyeing. It looks so much like Oklahoma Red Dirt!

Until we meet again....Ginger
Wednesday, April 10, 2013
Woolie Eyes, Flowers and Leaves

A fun and easy way to add a little dimension to a hooked piece is simply by rolling strips of wool onto each other. They make the most wonderful flowers, eyes, swirls in sheep, and leaves.
*Excuse the farmgirl hands....they get used everyday*

I am hooking a pumpkin mat and used a dark orange and black for the eyes. You can shape your wool into triangles, tear drops, circles, ovals, etc.

Start by selecting your wools you can use two strips or even more as shown in the very first picture where I had three strips.

Simple begin rolling the wool around each other.

Continue until you have the size you would like and cut off the remaining strips.

With a needle and thread run stitches back and forth on the outside wool strip going from one side through the center to the outside. Repeat around until it is secure.

I like to do about 4 to 5 stitches through mine.

Next just lay it down on your project and sew through the background material. Add several stitches until it is stable. You will hook right up to the piece that you stitched on.

For a flower with a little texture I took the edge of a a piece of wool that was a bit ruffled.

Added another wool edge from the red. I did trim up the edge just a bit since it was a little too raggedy for my liking.

Roll the two pieces together and you have a very nice textured flower.

For easy quick leaves just pinch together and sew tighter at one end.
Maybe these little pieces will make their way into a small hooked bouquet! If you haven't already tried this technique give it a try it adds a little extra dimension to your piece and is very quick and easy to do!
Until we meet again....Ginger
Tuesday, April 9, 2013
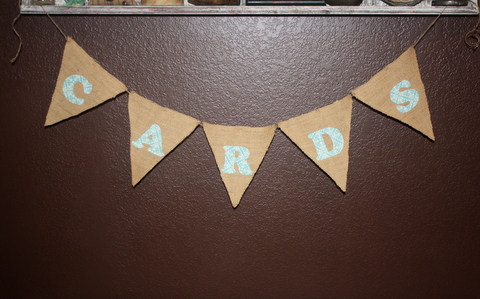
Easy Western Style Pennants

My daughter~in~law is helping her niece with her wedding and wanted some western style yet vintage pennants.
She asked if I could help and I thought I would share how easy it is to do!
Now you could use fabric of your choice and make some really fun pennants. She wanted burlap and a vintage style fabrics.

Step 1
Gather supplies...heat n' bond or wonder under, fabric, burlap, sharpie, template, scissors, big eye needle, jute, sewing machine, ruler.

Step 2
Cut heat n' bond slightly smaller than fabric. Lay fabric wrong side up on ironing table.

Step 3
Iron heat n' bond onto fabric with paper side up using NO steam.

Step 4
Trace letters onto fabric backwards. Once cut it will be right.
If you have an accuquilt cutter alphabet then cut your letters out.

Happily Ever After, Here Comes The Bride, Cards...just some of the ones I cut.
Step 5
Drink a large iced tea and admire your letters!

Step 6
Double the burlap and draw around the pennant template with a sharpie. You want your pennant to
be stable so you will be doing them with a double thickness.

Step 7
Sew around two pennants laid on top of each other using a scant 1/4 inch.

Step 8
Carefully cut off edge up to sewing line.

Step 9
Peel off paper backing from letters.

Step 10
Measure down from top of pennant how far you want letters to be.

Step 11
Iron on letters.

Step 12
Lay out pennants with ironed on letters in order.

Step 13
Thread needle with jute leaving a long tail for hanging later. Start with the last letter in the pennants...mine says CARDS so I started with S.
In right hand top corner insert jute go across to center and come up with jute to front then about 3 holes later go back through to back. Come back up to front side at left corner.

Here is the back of the pennant.

Step 14
Thread each pennant letter leaving enough of a tail on both ends for tying later.
You can embellish with buttons, lace, ribbons use different fabrics, pictures. They could be square, rectangle, oval, or a circle....actually the possibilities are endless.
Hope you enjoyed the pennant tutorial and whip up one for a fun little project!
Until We Meet Again....Ginger
Monday, April 8, 2013
Farmgirls For A Day

Once a month Pati Jane comes down to the farm and we spend Friday working on our projects then the following Saturday we host a "hooking, punching, stitching bee" to all who would like to attend.
We gab about things going on in our lives, share and inspire each other, and enjoy a bite of lunch and of course always dessert!
The day flies by way too fast but for a few hours time slows down and we enjoy the company of our farmgirls for a day.
So if you would like to join us sometime just send us an email and we will let you know when we will meet again....we would love to have you!

Carolyn purchased a painter's drop canvas and needle punched this fabulous tote.

Here is the other side....isn't is just as cute as can be!

She just learned how to hook and this is her very first piece! She is multi~talented for sure :)

Judy is busy needle punching a fall piece. She also does a lot of quilting!

Carol is a fine hooker and her pieces are absolutely the best! She is precise and her work shows it! She has just about decided to give hooking with a #8 cut a try!

Well while another Carol was up roaming around I quickly snapped a picture of her hooked tote. It is going to be a pattern on her site soon.

Here is the other side. If you would like you can stop by her and Dee's site at

Now these two girls are a hoot! You can just see the mischief in their faces can't you!!!
Veronica and Teresa are such fun they both are multi~talented. Veronica has been working on UFO's and Teresa is working on a rug that Frank Bielec designed for her. They both love bright colors!

Darlene and Elizabeth (mom and daughter) are fairly new to the group and we are so glad they are coming. They are working on appliqued wool penny rugs.

Judy and Glenda are friends from school...they usually have Karen with them who also went to school with them but her grandson was having his 1st birthday!
Judy is new to hooking and is on her 2nd project. Glenda learned to needle punch last year and she is becoming quite the puncher!

Pati Jane finished binding her rug, whipped together a penny rug, and was pulling loops on a new rug. She also whipped together a wonderful lunch of chicken salad and a nice green salad with lots of veggies!

Danny had been hauling more cattle to the farm for restocking and escaped to the living room while we gals enjoyed the rest of the day!
He loves it when the gals come for a day....great food and he likes to visit, too!

This is the piece I am working on once again. It is 3 foot by 5 foot and I'm just about to get it hooked. Just like a corner and the border. It's going to be a booger to bind! It is a pattern by Pine Island Primitives.
Well hope you enjoyed visiting with our Farmgirls!
Until we meet again.....Ginger
Saturday, April 6, 2013
We Have A Winner....

The winner of the hand ~dyed wool yarn is....
Thank you so much to all that left a comment. In the next couple of weeks we will be having another giveaway so be sure and stop back and see what we have!
We had a busy day at the farm today with fourteen of us hooking, punching, and stitching. I'll upload a few pics of some of the wonderful projects the gals are making soon. It was a sunny day but just a bit windy but we won't complain one little bit!
Thanks again to all of those that have visited our blog and we hope to share with you some new things we are working on really soon!
Until We Meet Again.....Ginger
Tuesday, April 2, 2013
Hand~Dyed Wool Yarn Giveaway

Pati Jane and I are having another giveaway. We are excited to announce that we are in the beginning stages of opening up a website to offer some of our handmade goods along with our hand~dyed wool yarns, patterns, and kits.
It is all still in the early stages but it is fun working together. We hope you will join us on our adventure!
So in the spirit of friendships we are having a giveaway of some of our hand~dyed 100% wool yarn. So if you would like to enter to win the 5 yarn cakes just be a follower of this blog and leave a comment on this post.
We will pick a winner this Saturday, April 6th. If you don't have a blog please leave an email address in your comment so we can contact you if your the winner.
Each yarn cake is 4ply wool yarn and have approx. 40 yards each.
Until We Meet Again....Ginger
Monday, April 1, 2013
Quick Primitive Hang Tags

Sometimes you just need a quick little tag and if your a primitive kind of gal like me then these are super quick and very easy to make.
You will need some blank hang tags, string, permanent ink pad, stamps, gloves, spray bottle, and a dye mixture.

Lay out your tags on a surface you don't mind getting stained. An old table cloth will do or a piece of fabric you don't mind getting stained.

You can mix together a strong mixture of coffee or tea add in some vanilla, cinnamon or whatever.
My mixture is walnut crystals, vanilla, and cinnamon. I've had it mixed up for a long time and it still smells good.

Just start spraying as heavy as you like.

It is pretty splotchy but that is okay.

Flip them over and you will repeat again on the other side.

I sprayed my ball of twine. It doesn't soak all the way through but I get enough to do what tags I'm working on and it dries fairly quickly.

Here is one of the tags close up. Wear those gloves you don't want your hands looking blotchy!

Crinkle up a few tags and try that for a slightly different look.

They flatten right out. No need for an oven but if your in a hurry just place your tags on a baking sheet lined with parchment paper. Heat the oven to 200 degrees and bake for just a couple of minutes...don't leave unattended!

Grab some of your stamps and ink pad once your tags are dry.

Stamp, stamp, stamp...add some of the string and there you go....super quick and easy!
Until We Meet Again....Ginger
Subscribe to:
Comments (Atom)